Users
Invite people, set and change roles, disable or remove accounts, run bulk actions, and audit API keys from the Lumen admin grid.
When to use it: When you need to add a teammate, change someone's role, pause or remove an account, or check who holds API keys.
Where to find it: Lumen → Users & Roles.
Who can use it: Luminary (admin).
The Users page is where you control who belongs to your workspace and what they can do. Every person you invite, the role they hold, and whether their account is active is managed from a single table here.
Celiq exposes member management through two surfaces that read and write the same underlying workspace membership: the Lumen → Users & Roles grid documented on this page, and the lighter Settings → Members view at /settings/members. Use the Lumen grid for day-to-day administration; use the Members view when you care about seat usage, pending invites, or demo-project visibility. See Workspace settings for the latter.
Overview
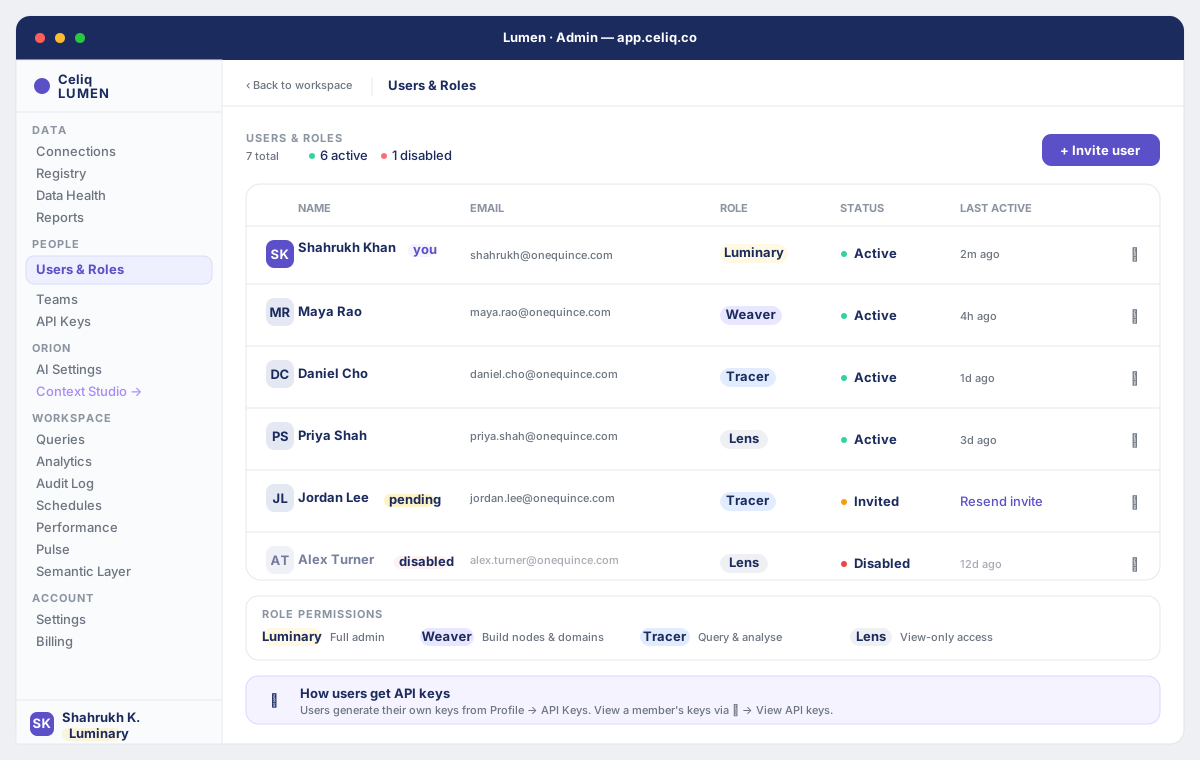
The grid lists every member of your workspace, one row each. Columns show the person's Name, Email, Role (as a colored badge), Status, and Last active. A header strip above the table summarizes the workspace: total members, how many are active, and how many are disabled.
Each row carries a checkbox for bulk selection and a ⋯ actions menu on the right. The actions menu is where you change a role, send a password reset, disable or enable the account, delete the user, and view that user's API keys. Your own row is marked with a you badge, and self-targeting actions (disable, delete, change role) are hidden on it.
From the top-right + Invite user button you add new people. Below the table, two reference cards explain how users get their own API keys and what each role can do.
When to use it
- Onboarding a teammate — invite them by email and assign a starting role.
- Changing access — promote, demote, or re-scope someone via the inline role picker.
- Offboarding — disable an account temporarily, or remove the user entirely.
- Cleaning up in bulk — select several rows and apply the same role or status change at once.
- Auditing API access — open a user's read-only API key list to see what keys exist and when they were last used.
Concepts
| Term | What it means |
|---|---|
| Role | The permission tier a member holds: Luminary, Weaver, Tracer, or Lens. The badge color in the Role column reflects this. |
| Status | The live state of an account. Active (has logged in), Invited (created but never logged in — also shown with a pending tag), or Disabled. |
| Disabled | A soft pause. The account remains in the workspace but the user cannot use it. Fully reversible by enabling. |
| Temporary password | A one-time password generated when you invite someone. It is shown once in the invite confirmation — share it with the new user, who should change it after first login. |
| API key (audit view) | A read-only list of the keys a user generated themselves. Admins can see metadata (name, prefix, scopes, dates) but never the key value. |
The four roles, from most to least access:
| Role | Summary |
|---|---|
| Luminary | Full admin plus all features. |
| Weaver | Build nodes and domains. |
| Tracer | Query and analyse data. |
| Lens | View-only access. |
For the full permission breakdown see Roles and Permissions.
Getting started
You must be a Luminary to use the Users page. To open it, go to Lumen → Users & Roles. The grid loads every member of your current workspace.
If the table shows No members yet, invite your team using the + Invite user button.
Step-by-step
Invite a new user
Click + Invite user at the top right. In the modal, enter the person's Email (required), an optional Name, and pick a Role (Tracer is preselected). Click Send invite →. On success the modal shows a temporary password — copy and share it with the new user, then click Done. An invitation email with an accept link is also sent automatically; the link expires in 7 days.
Change someone's role
Open the ⋯ menu on that person's row and choose Change role to expand the role picker. Select the new role — the change saves immediately and the badge updates. (You cannot change your own role from here.)
Disable or enable an account
In the ⋯ menu, choose Disable account to pause access; the row dims and the status switches to Disabled. To restore it, open the menu again and choose Enable account. You cannot disable your own account.
Remove a user
In the ⋯ menu, choose Delete user, then confirm in the inline prompt. This permanently removes the user from the workspace. You cannot delete your own account.
Run a bulk action
Tick the checkboxes for the rows you want (or the header checkbox to select all). A purple toolbar appears. Pick an action from the — bulk action — dropdown (Make Admin, Make Viewer, Make Editor, Disable accounts, or Enable accounts) and click Apply. The table refreshes to reflect the result. Use Clear to deselect.
View a user's API keys
In the ⋯ menu, choose View API keys. A modal lists that user's keys with name, masked prefix, scopes, and created / last-used / expiry dates. This view is read-only and never shows the key value — users generate keys themselves from Profile → API Keys.
Resend an invite
For a member who hasn't logged in yet, the Last active column shows a Resend invite link. Click it to send the invitation email again with the same role and name.
Examples
A common onboarding sequence: invite a new analyst as a Tracer, then later promote them once they start building.
1. + Invite user
   Email: jane.smith@company.com
   Name:  Jane Smith
   Role:  Tracer
   → Send invite →
   → Temporary password shown once: share it with Jane

2. Jane appears in the grid:
   Status = Invited (pending)   Last active = Resend invite

3. After Jane logs in:
   Status = Active              Last active = "2h ago"

4. Promote Jane to build the semantic model:
   ⋯ → Change role → Weaver
Promoting several read-only members to builders at once, using a bulk action:
1. Tick the checkboxes for three Lens members
2. Toolbar: "— bulk action —" → Make Editor   (sets role = Weaver)
3. Apply
4. Grid refreshes — all three now show the Weaver badge
The bulk dropdown labels map to roles as follows:
| Bulk action | Resulting role / status |
|---|---|
| Make Admin | Luminary |
| Make Editor | Weaver |
| Make Viewer | Lens |
| Disable accounts | Disabled |
| Enable accounts | Active |
Best practices
- Invite with the lowest role that fits. Start people as Tracer or Lens and promote with the role picker when their work expands. Reserve Luminary for people who genuinely administer the workspace.
- Disable before you delete. Disabling is reversible and keeps the record; deletion is permanent. Use disable for someone who is leaving temporarily or whose access you want to revisit.
- Share the temporary password securely. It is displayed only once at invite time. Pass it through a secure channel, and remind the user to change it after their first login.
- Audit API keys when offboarding. Before removing someone, open View API keys to see whether they hold active keys that downstream systems might depend on.
- Keep more than one Luminary. The Members view enforces a minimum of one Luminary; keeping at least two avoids ever being locked out of admin.
Tips
The grid distinguishes Invited from Active automatically: a member who has never logged in shows a pending tag and an Invited status until their first sign-in. If someone says they never received their invite, use the Resend invite link in their row's Last active column rather than creating a second account.
Common mistakes
- Expecting to manage your own account here. Change role, disable, and delete are intentionally hidden on your own row. Use a second Luminary to act on your account if needed.
- Losing the temporary password. It is shown once and not stored in the grid. If it's lost, use ⋯ → Send password reset to email the user a reset link instead.
- Confusing the two surfaces. The Lumen grid and Settings → Members both manage membership but present different controls. Seat usage, pending invitations, and demo-project visibility live in the Members view, not here.
- Inviting someone who already belongs. Re-inviting an active member from the Members view is rejected because they are already a member; check the grid first.
Troubleshooting
| Symptom | Cause | Fix |
|---|---|---|
| "A user with that email already exists" on invite | Someone with that email is already in the workspace | Find them in the grid; change their role instead of re-inviting. |
| "Cannot disable your own account" | You tried to disable your own row | Have another Luminary disable it, or pick a different user. |
| "Cannot delete your own account" | You tried to delete your own row | Have another Luminary remove it instead. |
| "Could not change the role. Please try again." | The role update request failed | Retry; if it persists, confirm the user still exists in the grid (they may have been removed). |
| "User not found" | The user was already deleted or belongs to another workspace | Refresh the page to reload the current member list. |
| API keys modal shows "No API keys yet" | The user hasn't generated any keys | Expected — keys are created by users from Profile → API Keys, not by admins. |
| Member view: "Your workspace has reached its seat limit." | Active seats equal the seat limit | Free up a seat (remove or disable a member) or contact sales to add seats — see Workspace settings. |
| Member view: "Workspace must have at least one Luminary." | You tried to demote or remove the last Luminary | Promote another member to Luminary first, then retry. |
Related pages
- Roles — what each role can and cannot do
- Permissions — how role-based access is enforced
- Workspace settings — seat usage, pending invites, and demo-project visibility in the Members view
- Authentication — sign-in, password resets, and account security
- API keys — how users create and manage their own keys
- Teams — group members for shared access